写真を図面に追加 (Android)
考慮すべきこと
-
必須ユーザー権限:
-
図面に写真を追加するには、 プロジェクトの図面ツールに対する「読み取り専用」以上の権限、およびプロジェクトの写真ツールに対する「読み取り専用」以上の権限。
メモ: 写真ツールに対して「読み取り専用」権限を持つユーザーは、写真ツールにすでに存在する写真のみを選択できますが、「標準」または「管理者」権限を持つユーザーは新しい写真を追加することもできます。 -
個人マークアップを公開済みレイヤーに公開するには、プロジェクトの図面ツールの「標準」または「管理者」。「 個人マークアップと公開済みマークアップの違いは何ですか?」を参照してください。
-
-
追加情報:
-
図面に追加された写真は、「図面からの写真」アルバムの写真ツールにも表示されます。写真の「起点」フィールドには、写真がいつ図面ツールからアップロードされたかが示されます。
注: マークアップからの写真は、マークアップが公開されている場合にのみ「図面からの写真」アルバムに表示されます。
-
-
-
新しいビューとワークフローが発注書と下請契約の両方に適用されるようになりました。
-
説明、包含、除外などの詳細は、展開または折りたたんで、ビューをすっきりと保つことができます。
-
価値表 と 変更指示 が独立したサブタブに整理されるようになり、過度のスクロールの必要性が減りました。
-
添付書類は委託契約・発注の上部に表示されるため、すばやくアクセスできます。
-
この項目は、以前に携帯機器で表示およびキャッシュされていた場合は、オフラインで表示または編集できます。オフライン モードで実行されたタスクは、ネットワーク接続が再確立されると Procore と同期されます。
-
-
Android 携帯機器上の Procore アプリケーションを使用して、[ 図面 ] ツールに移動します。
-
写真を追加したい図面をタップします。
-
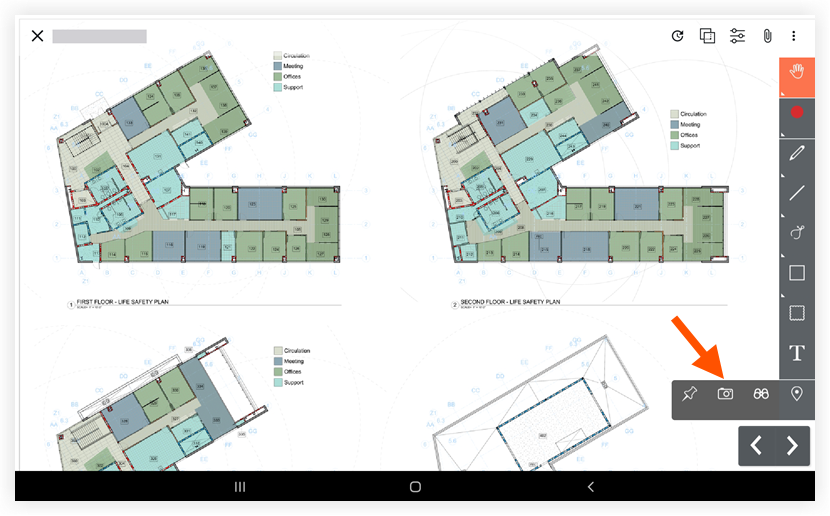
マークアップ ツールバー から カメラ アイコン を選択するか、図面内の既存のカメラ マークアップ アイコンを選択して、その場所に写真を追加します。下の画像を参照してください。
-
写真を配置する図面上の場所をタップします。
-
次のオプションから選択します:
-
Procore から選択します。 このオプションをタップして、プロジェクトの写真ツールから既存の写真を選択します。
-
[ライブラリから選択]: このオプションをタップして、携帯機器の写真ライブラリから写真ファイルを選択します。
-
カメラ: このオプションをタップして、機器のカメラで新しい写真を撮影します。
メモ: 個人レイヤーに写真を追加した後はカメラ アイコンを移動できますが、プロジェクトの全員が公開レイヤーで閲覧できるように写真を公開した後は、アイコンを移動することはできません。個人の図面マークアップツールと公開済み図面マークアップツールの違いとは?-
マークアップなしで写真を撮ります。
-
シャッターをタップして写真を撮ります。
-
[X] をタップします。
-
-
マークアップで写真を撮ります。
-
マークアップ
 アイコンをタップして写真を撮り、すぐにマークアップします。
 -
シャッターをタップして写真を撮ります。
-
元の写真とマークアップした写真の両方を保存する場合は、[ 新しい写真として保存 ] をタップします。
または
マークアップした写真のみを保存する場合は、[ 上書き する] をタップします。 -
[X] をタップします。
-
-
-
-
オプション: [ 公開] をタップして、チームが参照できる個人の図面マークアップツールを公開します。
-
オプション: マークアップ ツールを [選択 ] し、図面内のカメラ アイコンをタップすることで、リンクした写真を表示します。
-
オプション: 「図面からの写真」アルバムの [写真] ツールで図面に追加したすべての写真を表示します。