「[NextWave 安全ソリューション] はしごの安全 - シンプルなチェックリスト」検査テンプレートをプロジェクトで使用するにはどうすればよいですか?
背景
Procore は、「[NextWave 安全ソリューション] はしごの安全 - シンプルなチェックリスト」という新しい検査テンプレートを追加しました。この検査テンプレートは、検査ツールが有効になっているすべての会社の会社レベルの検査ツールに自動的に追加されます。このテンプレートをプロジェクトの1つ以上の検査ツールに追加する方法については、 以下のステップ を参照してください。
このチェックリストを使用して、基本的なはしごの安全を確立することをお勧めします。このテンプレートで提供される情報は一般的なものであり、ガイドのみを目的としています。各プロジェクトは独自のものであり、適切と思われる場合には追加の要件が適用される場合があります。
重要
このテンプレートは情報提供のみを目的として提供されており、法的アドバイスを提供することを目的としていません。特定の問題に関してアドバイスを得るには、弁護士に連絡することをお勧めします。このテンプレートの使用は、適用されるいかなる法律や規制への準拠も保証するものではありません。プレビュー

ステップ
- ステップ1: オプション。会社レベルで検査テンプレートを編集する
- ステップ2: 検査テンプレートをプロジェクトに追加する
- ステップ3: オプション。プロジェクトレベルで検査テンプレートを編集する
- ステップ4: 検査を実行する
- ステップ5: 検査を終了する
ステップ1: オプション。会社レベルで検査テンプレートを編集する
テンプレートが使用されているすべてのプロジェクトに影響する変更を検査テンプレートに加えたい場合は、プロジェクトにテンプレートを追加する前に会社レベルで検査テンプレートを編集することをお勧めします。
「会社レベルの検査テンプレートを編集する」を参照してください。または
こちらをクリックしてステップを表示します。
- Navigate to the Company level Inspections tool.
- Locate the template and click Edit.
- Under General Information, click on any editable field to make your changes.
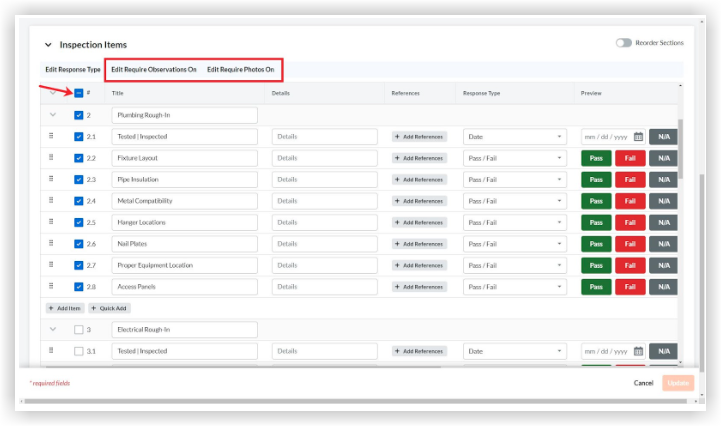
- Under Inspection Items, click on any editable field to make your changes.
- To delete a template section or item, click the trash bin
 icon at the end of the section or item.
 - To bulk edit your inspection items, mark the checkbox next to the # symbol to select all the sections of your inspection.

- Choose from additional editing options:
Bulk Edit Response Type
- Click Edit Response Type
- Select the response type from the response type menu.
- Click Apply.
Bulk Edit Inspection Requirements
- Click Edit Require Observations On or Edit Require Photos On.
Note: If the requirement is not provided by the user, the inspection response will not be saved.- Status: You can select either a 'Conforming' or 'Deficient' status, or you can select both.
- Responses: You can select either 'Pass', 'Fail', or 'N/A' responses, or you can select a combination of the three. You can also select 'Not Required'.
- Click 'X' to remove any of your response types.
Add Sections and Items
- Click + Add section to add more sections.
- Click + Add item to add more items.
- Click + Quick Add to quickly add multiple section items at one time.
Note: You can reorder individual items within a section of your template by dragging your item with the reorder icon. To reorder an entire section, click the toggle on
  icon next to Reorder Sections and drag the sections of your choice. Turn off Reorder Sections to continue creating your template.
 - Click + Add References to attach files from your computer for additional inspection item details.
- Click Update to save your changes.
ステップ2: 検査テンプレートをプロジェクトに追加する
検査テンプレートをそのプロジェクトで使用するには、プロジェクトレベルの検査ツールに検査テンプレートを追加する必要があります。
「会社レベルの検査テンプレートをプロジェクトに追加する」を参照してください。または
こちらをクリックしてステップを表示します。
- Navigate to the Project level Inspections tool.
- Click the Configure Settings
 icon.
icon.
Note: For more information on configuring your advanced settings, see Configure Advanced Settings: Inspections. - Click the Templates tab.
- Click Import Company Templates.
Note: This button will be disabled if you have not first Created a Company Level Inspection Template. - Mark the checkbox next to one or more company inspection templates to use on this project.
Notes:- Only templates that you haven't added to your project will appear for you to select.
- To narrow your options down, filter templates by Type or Trade by clicking the Add Filter drop-down menu.
- Click Import Templates.
Note: Project templates may be modified here throughout the duration of the project, but changes will only be reflected on project inspections that are created from the modified template.
ステップ3: オプション。プロジェクトレベルで検査テンプレートを編集する
テンプレートが使用されている1つのプロジェクトのみに影響する変更を検査テンプレートに加えたい場合は、検査テンプレートをプロジェクトに追加した後、プロジェクトレベルで検査テンプレートを編集することをお勧めします。
「プロジェクトレベルで検査テンプレートを編集する」を参照してください。または
こちらをクリックしてステップを表示します。
- Navigate to the Project level Inspections tool.
- Click the Configure Settings
 icon.
icon. - Click Templates.
- Click Edit next to the inspection template that you want to edit.
Note: An icon indicates a Company level Inspection template has been added to the project.
- Under 'General Information', edit the following fields:
Note: If the template you are editing is a Company level Inspection template, certain fields cannot be edited in the Project level Inspections tool. These fields are indicated by an icon.
- Name : Title your inspection. This will show up on your inspections log page and will help you differentiate between your inspections within your project. This is a required field.
- Type : Choose from the list of inspection types added to the company (e.g. Safety). (Note: If you have not added inspection types to your project, see Configure Advanced Settings: Company Level Inspections. You will need to have 'Admin' level permissions on the Company level Inspections tool.)
- Trade (Optional): Give your inspection a trade (e.g. Electrical, plumbing). (Note: Your company's trade list can be managed at your company level's Admin tab under 'Trade Configuration.)
- Company Description : Company level Inspection templates may include a separate description.
- Description (Optional): Include any relevant details about the inspection.
- Attachments: Attach any relevant files to the templates by clicking Attach Files.
Note: If you try to create an inspection template without a name or with a name that already exists, there will be an error message that details the reason. You can create an inspection with the same name as one in the Recycle Bin, but once you name it, you cannot restore a template in the Recycle Bin without first editing an inspection template to change the name.
- Name
- To edit existing sections and items on the template, click on the field you want to edit.
Note: Existing sections and items cannot be edited on Company level inspection templates in the Project level Inspections tool. - To delete a template section or item, click the trash bin icon to the right of the item heading.
- To bulk edit your inspection items, mark the checkbox next to the # symbol to select all the sections of your inspection.
- Choose from additional editing options:
Bulk Edit Response Type
- Click Edit Response Type
- Select the response type from the response type menu.
- Click Apply.
Bulk Edit Inspection Requirements
- Click Edit Require Observations On or Edit Require Photos On.
Note: If the requirement is not provided by the user, the inspection response will not be saved.- Status: You can select either a 'Conforming' or 'Deficient' status, or you can select both.
- Responses: You can select either 'Pass', 'Fail', or 'N/A' responses, or you can select a combination of the three. You can also select 'Not Required'.
- Click 'X' to remove any of your response types.
Add Sections and Items
- Click + Add section to add more sections.
- Click + Add item to add more items.
- Click + Quick Add to quickly add multiple section items at one time.
Note: You can reorder individual items within a section of your template by dragging your item with the reorder icon. To reorder an entire section, click the toggle on icon next to Reorder Sections and drag the sections of your choice. Turn off Reorder Sections to continue creating your template. - Click + Add References to attach files from your computer for additional inspection item details.
- Click Update to save your changes.
ステップ4: 検査を実行する
ヒント
検査は、Procore の iOS と Android の携帯アプリケーションを使用して実行することもできます。「検査を実行する (iOS)」および「検査を実行する (Android)」を参照してください。「検査を実行する」を参照してください。または
こちらをクリックしてステップを表示します。