(ベータ版)元請契約の編集
目的
元請契約を編集すること。
背景
契約はいつでも編集できます。 不注意による追加、更新、削除から契約の財務データを保護するため、「必要なユーザー権限」を持つユーザーのみが契約を編集できます。 さらに、Procore の既定の設定では、契約が「承認済み」ステータスのときにユーザーが価値表 (SOV) を編集できないように制限されています。
考慮すべきこと
- 必要なユーザー権限:
- プロジェクトの元請契約ツールに対する「管理者」レベルの権限。
- 追加情報:
- Procore の既定の設定では、契約が「承認済み」ステータスの場合、すべてのユーザーが元請契約の予定価格表を編集できないように制限されます。たとえば、「承認済み」ステータスの元請契約の予定価格表を編集することはできません。 これは、元請契約変更指示 (PCCO) または発注者への請求書の予定価格表が「承認済み」ステータスの場合にも当てはまります。
- オンにするのは珍しい設定ですが、「必要なユーザー権限」を持つユーザーがどのステータスでも契約を編集できるように契約を構成できます。 詳細については、「[価値表を常に編集可能にする] 設定とは何ですか?」を参照してください。
前提条件
ステップ
元請契約を編集する
- プロジェクトの [元請契約] ツールに移動します。
- リストで更新する契約を見つけます。
- [ 番号 ] リンクをクリックして開きます。
- [ Edit Contract] ボタンをクリックします。
- 次のオプションから選択します。
基本情報を編集する
Update the basic contract information as follows:

Notes
- There are no required fields when adding the basic contract information.
- If you click the Create button without completing any data entry, Procore saves the prime contract, lists you as the creator, and automatically places it in the Draft status.
- Number
To number your contract(s), choose from these options:- If you number your contracts using a sequential numbering system, you can enter any combination of alpha-numeric characters in this box. For subsequent contracts, Procore automatically applies consecutive numbering in ascending order.
Example
The examples below show you how Procore's ascending consecutive numbering works:
- If the previous contract was 1, the next contracts are 2, 3, and so on.
- If the previous contract was PC-0001, the next contracts are PC-0002, PC-0003, and so on.
- If the previous contract was DCA00010-12-G-0001, the next contracts are DCA00010-12-G-0002, DCA00010-12-G-0003, and so on.
- If you do NOT number your contracts using sequential numbering, you can manually enter a unique number for each prime contract. To do this, type over the existing entry in the Number box. Duplicate contract numbers are NOT permitted.
- If you number your contracts using a sequential numbering system, you can enter any combination of alpha-numeric characters in this box. For subsequent contracts, Procore automatically applies consecutive numbering in ascending order.
- Contract Company
Select the name of the company performing the work or supplying materials for this contract. To appear as a list option, see Add a Company to the Project Directory. - Title
Type a descriptive name for the contract.
一般情報を編集する
Update the contract with more general information:
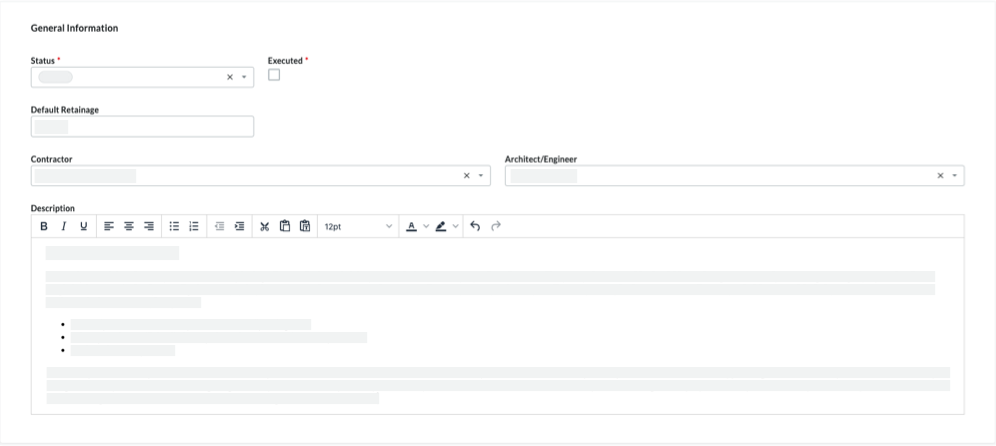
- Status
Procore automatically assigns contracts the 'Default' status. To select a different status, choose one of the status labels from the drop-down list. Options include Draft, Out for Bid, Out for Signature, Approved, Complete, or Terminated.Note
To create Prime Contract Change Orders (PCCOs) and owner invoices, your prime contract's status must be set to Approved or Complete. - Executed
Place a mark in this check box if the contract has been fully executed. A fully executed contract is a legally effective agreement that has been signed by authorized representatives for each party. - Default Retainage
Enter a number to represent the percentage that will be withheld as retainage on the line items of the contract's Schedule of Values. For example, if you plan to withhold ten (10) percent of the line item's value, enter 10%. - Contractor
Select the 'Contractor' from this drop-down list. This is the company that your team hired to perform the work. To appear as a list option, Add a Company to the Project Directory. - Architect/Engineer
Select the lead architect or engineer for the project from this drop-down list. To appear as an option in this list, the company must have a record in the Project Directory. - Description
Enter a more detailed description of the prime contract. You can apply the options in the formatting toolbar to your text.
アクセス権限を編集する
By default, prime contracts are visible to all users with 'Read Only' level permissions or higher on the project's Prime Contracts tool. To change its access permissions, do the following on the 'Contract Access' card:
- Optional: Move the Restrict This Contract's Visibility to Only Project Admins and Select Non-Admin Users toggle to the left or right to turn the restriction OFF and ON. Procore turns this setting ON by default.
Notes
- The toggle is BLUE when restrictions are turned ON.
- The toggle is GRAY when restrictions are turned OFF.
- Optional: To provide users with 'Read-Only' or 'Standard' level permissions on the project's Prime Contracts tool with access to the contract, select the person's name from the Access for Non-Admin Users drop-down list. To appear as an option in this list, a user must have a profile in the Project Directory.

- Optional: To provide the users in the 'Access for Non-Admin Users' list with access to view the Schedule of Values, mark the Allow These Non-Admin Users to View the SOV Items checkbox.
日付を編集する
To update the prime contract with important dates, do the following:

Note
Your company's Procore Administrator manages the dates that appear in the 'Contract Dates' section using the configurable fieldsets feature. For details, see Which fields in the Prime Contracts tool can be configured as required, optional, or hidden?- Start Date
Select the construction project's official start date. - Estimated Completion Date
Select the construction project's estimated completion date from the calendar control. - Substantial Completion Date
Select the construction project's substantial completion date from the calendar control.Tip
If the 'Substantial Completion Date' field is available on your project, keep in mind that Procore automatically updates the 'Substantial Completion Date' to match the 'Revised Substantial Completion Date' from each Prime Contract Change Order (PCCO) when each change order is 'Approved.' - Actual Completion Date
Select the construction project's actual completion date. - Contract Date
Select the contract date from the calendar control. - Signed Contract Received Date
Select the date from the calendar control. The signed contract received represents the date that the executed contract was received. - Execution Date
Select the date from the calendar control. The execution date represents the date the agreement was signed by authorized representatives of all contract parties. - Issued On Date
Select the date from the calendar control. The issued on date represents the date the contractual agreement was issued to both parties. - Returned Date
Select the date from the calendar control. The returned date is the date the contract was returned. - Letter of Intent Date
Select the Letter of Intent (LOI) date from the calendar control. - Approval Letter Date
Select the Letter of Approval (LOA) date from the calendar control. - Contract Termination Date
Select the date from the calendar control. A contract termination date is a date outlined in the prime where all parties have met all contractual obligations and terms. - Delivery Date
Select the date from the calendar control.
包含と除外を編集する
Contract inclusions and exclusions vary from project to project. However, the intent is to define exactly what is included and NOT included in the contract's price and scope of work. To update the contract's 'Inclusions and Exclusions' card, do the following:

- Inclusions
Add the contract's inclusions in this box. You can apply the options in the formatting toolbar to your text. - Exclusions
Add the contract's exclusions in this box. You can apply the options in the formatting toolbar to your text.
会計処理法を編集する
価値表の編集
予定価格表を編集する場合は、次のオプションがあります。
項目を編集する
インライン編集機能を使用して、既存の項目を編集できます。 データセルの1つをクリックして、既存のコンテンツを置き換えるだけです。
項目 の追加と削除
- [契約] に移動します。
- [価値表 ] タブをクリックします。
- 垂直の省略記号 (⋮) をクリックします。次に、次のオプションのいずれかを選択します。
- 上記に追加します。 現在の項目の上に項目を追加するには、このオプションを選択します。 追加された項目は、契約の [変更履歴] タブに記録されます。
- 以下に追加します。 現在の項目の下に項目を追加するには、このオプションを選択します。追加された項目は、契約の [変更履歴] タブに記録されます。
- [削除] をクリックします。 現在の項目を削除するには、このオプションを選択します。 削除された項目は、契約の [変更履歴] タブに記録されます。
- [保存する] をクリックします。
項目を並べ替える
項目をリストの一番上に移動するには、移動するセルをクリックします。 次に、リストに「1」と入力します。 これにより、選択した行がリストの一番上に移動し、既存のすべての明細項目が連続昇順に調整されます。
添付書類を編集する
元請契約の添付書類を追加または削除できます。 契約が任意のステータスのときに、添付書類を追加および削除できます。
添付書類を追加する
To add file attachments to a prime contract:
- On the 'Attachments' card, click Edit.
- Click Attach Files.
- In the 'Attach Files' dialog box, highlight the location where the files to upload are stored. Options include:
- My Computer. Click Upload Files to open your computer's finder. Select the files to upload and click Open.
- Photos. If the Photos tool is active on the project, choose the location from the Select Album list and then search for the file(s) to upload.
- Drawings. If the Drawings tool is active on the project, choose the area from the Select Area list and then search for the file(s) to upload.
- Forms. If the Forms tool is active on the project, choose the template from the Select Template list and then search for the file(s) to upload.
- Documents. If the Documents tool is active on the project, navigate to the folder storing the file(s) to upload and then highlight them.
- Click Attach.

A progress indicator shows you the status of the upload. - Click the Close (X) icon on the Attach Files dialog box.
添付書類の削除
添付書類を削除するには:
- 「添付書類」カードで、[編集] をクリックします。
- 削除するファイルの (x) をクリックします。

- 「添付書類」カードの [ 保存 ] をクリックします。