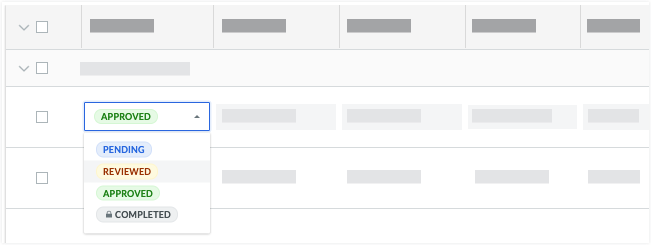
会社レベルのタイムシート ツールでタイムカード入力データを完了としてマークする
目的
会社レベルのタイムシート ツールで タイムカード入力データ のステータスを「完了」に変更すること。
背景
タイムカード入力データは、現場の従業員、作業員、職長、または監督が完了するように設計されています。提出されたら、通常、毎週末に会計に送信する前に、正確性を確認する必要があります。承認は、プロジェクトレベルのタイムシート ツールに入力されます。これにより、スーパーバイザーは追加の検証を実行して、給与計算の準備が整っていることを確認し、タイムカード入力による説明責任を高めることができます。タイムカード入力データが承認された後、会社レベルのタイムシートツールの最終ステップに進むことができ、タイムカード入力データは「完了」としてマークされます。
ヒント
時間データをエクスポートするときに、時間データを自動的に「完了」としてマークできます。考慮すべきこと
- 必要なユーザー権限
- 署名済みのタイムカード データを編集すると、Procore は署名を削除します。従業員は再度署名する必要があります。「タイムシートに署名する (Android)」および「タイムシートに署名する (iOS)」を参照してください。
- ゼロ (0) 時間のタイムカード データがサポートされています。 これにより、チームは休暇や日当を入力するために必要な柔軟性が得られます。
- 「承認済み」タイムカード入力データ:
- プロジェクトのタイムシート ツールでは編集できません。
- 会社レベルのタイムシート ツールでのみ「完了」としてマークできます。
- 「完了」タイムカード データ:
- プロジェクトレベルでは編集できません。「会社レベルのタイムシート ツールで時間データを編集する」および「会社のタイムシートを一括で編集する」を参照してください。
前提条件
- タイムシート ツールに表示するには、従業員のユーザー アカウントで [<Your Company> の従業員です] チェックボックスをオンにする必要があります。「プロジェクト ディレクトリでユーザー アカウントを編集する」を参照してください。
- 随意: すべての従業員を表示および追跡できるようにするには、「すべてのプロジェクトで従業員を追跡できますか?」設定が有効になっていることを確認します。「詳細設定を構成する: 会社レベルのタイムシート」を参照してください。有効にすると、ユーザーはすべての従業員と作業員を表示するには、会社ディレクトリで「読み取り専用」以上の権限を持っている必要があります。
- プロジェクトレベルのタイムシート ツールでタイムシートを作成する
動画
ステップ
- 会社の [タイムシート ] ツールに移動します。
- 次のオプションから選択して、承認する従業員のタイムカード データを見つけます。
- 特定の従業員のタイムカード データを検索するには、[検索] ボックスに従業員名を入力し、
 アイコンをクリックします。
 - 特定の週の稼働時間のタイムカード データを表示するには、ページ上部の左矢印または右矢印をクリックします。稼働日の設定は、ツール管理者が構成します。「詳細設定を構成する: 会社レベルのタイムシート」を参照してください。
- ページ上で表示される項目を絞り込むには、フィルターを追加します。ガイドラインについては、「 会社レベルのタイムシートの検索とフィルタリング」を参照してください。
- 特定の従業員のタイムカード データを検索するには、[検索] ボックスに従業員名を入力し、
- 次のオプションから選択します:

- 単一のタイムカード入力データを承認するには、そのステータス バブルをクリックし、ドロップダウンリストから「承認済み」を選択します。
- 複数のタイムカード入力データを承認するには、一括入力機能を使用します。「 会社レベルのタイムシート ツールで一括承認アクションを実行する」を参照してください。

